



























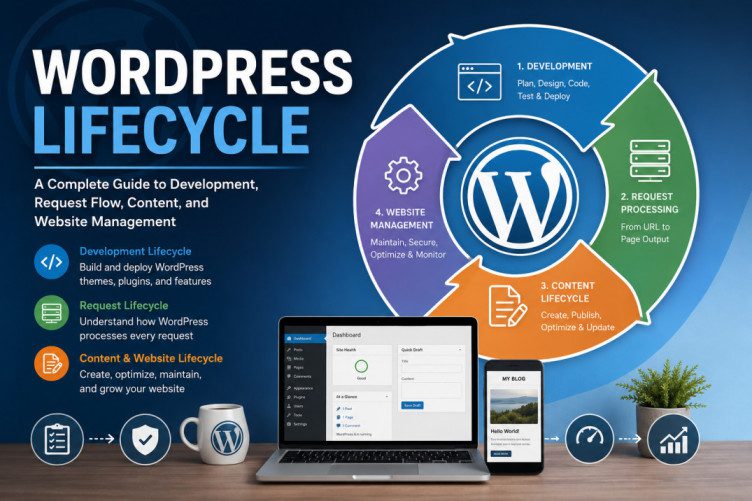
WordPress Lifecycle: A Complete Step-by-Step Guide to Development, Request Processing, and Website Management
WordPress Lifecycle: Everything You Need to Know
WordPress powers more than 40% of websites worldwide, making it the most popular Content Management System (CMS). Whether you’re a beginner building your first website or an experienced developer creating custom themes and plugins, understanding the WordPress lifecycle helps you build faster, troubleshoot efficiently, and optimize performance.
This guide covers every important lifecycle in WordPress:
- WordPress Development Lifecycle
- WordPress Request Lifecycle
- WordPress Website Lifecycle
- WordPress Content Lifecycle
- WordPress Maintenance Lifecycle
By the end of this guide, you’ll understand how WordPress works from installation to serving pages and maintaining a successful website.
What Is the WordPress Lifecycle?
The WordPress lifecycle refers to the complete journey of a WordPress website—from planning and development to deployment, daily operation, updates, and long-term maintenance.
Different professionals interact with different parts of the lifecycle:
- Developers focus on code execution.
- Designers focus on user experience.
- Content creators focus on publishing.
- Site owners focus on growth and maintenance.
Understanding the complete lifecycle allows everyone to work together efficiently.
1. WordPress Development Lifecycle
This is the process developers follow when creating a WordPress website.
Step 1: Planning
Before writing code, define:
- Website goals
- Target audience
- Required features
- Theme selection
- Plugin requirements
- Hosting provider
- Budget
- Timeline
A solid plan reduces future development costs.
Step 2: Local Development
Instead of working directly on a live website, developers create a local development environment using tools such as:
- LocalWP
- XAMPP
- MAMP
- Laragon
- Docker
Benefits include:
- Safe testing
- Faster development
- No impact on visitors
Step 3: Theme Development
Choose between:
- Block Themes
- Classic Themes
- Child Themes
- Custom Themes
During this stage developers create:
- Templates
- Template Parts
- Styles
- Navigation
- Responsive layouts
Step 4: Plugin Development
Plugins extend WordPress functionality.
Examples include:
- Contact forms
- SEO tools
- Membership systems
- Custom Post Types
- Payment gateways
Good plugins follow WordPress Coding Standards and avoid modifying core files.
Step 5: Testing
Testing should include:
- Mobile responsiveness
- Cross-browser compatibility
- Performance
- Accessibility
- Security
- Plugin conflicts
- PHP compatibility
Testing tools:
- Lighthouse
- GTmetrix
- PageSpeed Insights
- Query Monitor
Step 6: Deployment
After testing:
- Move files to production
- Import database
- Configure DNS
- Enable SSL
- Test again
Deployment methods include:
- FTP/SFTP
- Git
- CI/CD pipelines
- Hosting migration tools
Step 7: Maintenance
The work doesn’t stop after launch.
Regular tasks include:
- WordPress updates
- Theme updates
- Plugin updates
- Security monitoring
- Backups
- Database optimization
- Broken link checking
2. WordPress Request Lifecycle
This lifecycle explains what happens when a visitor opens a WordPress page.
Imagine someone visits:
https://example.com/about-us
WordPress performs many operations before displaying the page.
Step 1: Web Server Receives Request
The web server (Apache or Nginx):
- Receives the URL
- Locates WordPress
- Loads index.php
Everything begins with:
index.php
Step 2: wp-blog-header.php Loads
This file initializes WordPress.
It loads:
- wp-load.php
- Environment
- Configuration
- Plugins
- Themes
Step 3: wp-load.php
This loads:
wp-config.php
which contains:
- Database credentials
- Authentication keys
- Debug settings
- Table prefix
Step 4: wp-settings.php
This is one of the most important files in WordPress.
It loads:
- Core functions
- Plugins
- Themes
- Widgets
- Taxonomies
- Rewrite rules
Most of WordPress initialization happens here.
Step 5: Plugins Load
Active plugins are initialized.
Important hooks include:
muplugins_loaded

plugins_loaded

init
Plugins can:
- Register custom post types
- Load translations
- Register widgets
- Create REST routes
Step 6: Theme Loads
WordPress loads:
functions.php
Then:
- Menus
- Sidebars
- Theme supports
- Assets
Step 7: Parse Request
WordPress determines:
- Homepage?
- Blog?
- Single post?
- Archive?
- Category?
- Tag?
- Search page?
- 404 page?
Step 8: Database Query
Using WP_Query, WordPress retrieves:
- Posts
- Pages
- Users
- Metadata
- Taxonomies
- Comments
Step 9: Template Selection
WordPress follows the Template Hierarchy.
Example:
single-post.php

↓

single.php

↓

singular.php

↓

index.php
This determines which template renders the page.
Step 10: Page Rendering
Finally WordPress outputs:
- HTML
- CSS
- JavaScript
- Images
The visitor now sees the completed page.
Common WordPress Hooks During Request Lifecycle
Frequently used hooks include:
plugins_loaded

init

wp_loaded

template_redirect

wp_head

wp_footer

shutdown
Developers use these hooks to extend WordPress without editing core files.
3. WordPress Website Lifecycle
This lifecycle describes the overall journey of a WordPress website.
Stage 1: Planning
- Goals
- Competitor research
- Audience
- Site structure
Stage 2: Design
Create:
- Wireframes
- Mockups
- Brand guidelines
- Typography
- Color palette
Stage 3: Development
Build:
- Theme
- Plugins
- Pages
- Forms
- Integrations
Stage 4: Testing
Check:
- Speed
- SEO
- Mobile usability
- Accessibility
- Security
Stage 5: Launch
Before launch:
- Enable SSL
- Configure backups
- Submit sitemap
- Configure analytics
- Verify Search Console
- Test forms
Stage 6: Growth
Focus on:
- Blogging
- SEO
- Email marketing
- Social media
- Lead generation
Stage 7: Optimization
Improve:
- Core Web Vitals
- Caching
- Image optimization
- Database cleanup
- UX improvements
Stage 8: Long-Term Maintenance
Maintain:
- Updates
- Monitoring
- Security scans
- Performance audits
- Content refreshes
4. WordPress Content Lifecycle
Every piece of content follows its own lifecycle.
Idea
Research keywords.
Draft
Write the article.
Review
Proofread and optimize.
Publish
Make content live.
Promote
Share through:
- Social media
- Email newsletters
- Communities
Monitor
Track:
- Traffic
- Rankings
- Engagement
- Conversions
Update
Refresh:
- Statistics
- Images
- Screenshots
- Internal links
- Outdated information
Regular updates improve search rankings and keep content relevant.
Best Practices Throughout the WordPress Lifecycle
- Never edit WordPress core files.
- Use child themes for customizations.
- Keep plugins updated.
- Limit unnecessary plugins.
- Enable automatic backups.
- Use staging sites before deploying changes.
- Optimize images before uploading.
- Implement caching.
- Monitor performance regularly.
- Follow WordPress Coding Standards.
- Use version control (Git) for custom development.
- Test updates on a staging environment first.
Common Mistakes to Avoid
- Updating plugins directly on a live site without testing.
- Ignoring backups before major changes.
- Installing too many plugins, which can affect performance and security.
- Using outdated themes or unsupported plugins.
- Neglecting image optimization.
- Forgetting to secure the login page and administrator accounts.
- Not monitoring website uptime or performance.
- Failing to refresh outdated content.
Frequently Asked Questions
What is the WordPress lifecycle?
The WordPress lifecycle encompasses every phase of a WordPress website, from planning and development to deployment, daily request processing, content management, optimization, and ongoing maintenance.
Why is understanding the request lifecycle important?
It helps developers debug issues, optimize performance, create better plugins, and understand when WordPress loads themes, plugins, and templates.
How often should a WordPress site be maintained?
Maintenance should be continuous. Check for updates weekly, monitor security daily, back up the site regularly, and perform performance audits monthly.
Does every WordPress request follow the same lifecycle?
Most front-end requests follow a similar process, but admin pages, REST API endpoints, AJAX requests, XML-RPC calls, and WP-CLI commands have slightly different execution paths.
Can I customize the lifecycle?
Yes. WordPress provides an extensive hook system (actions and filters) that allows developers to customize behavior at nearly every stage without modifying the core software.
Conclusion
The WordPress lifecycle extends far beyond simply installing WordPress. It includes planning, development, request handling, content creation, optimization, and long-term maintenance. Understanding each stage helps developers write cleaner code, enables site owners to keep websites secure and fast, and allows content creators to publish and maintain high-quality content that performs well over time.
Whether you’re building a personal blog, an eCommerce store, or a large enterprise website, mastering the WordPress lifecycle will help you create more reliable, scalable, and successful websites.