
























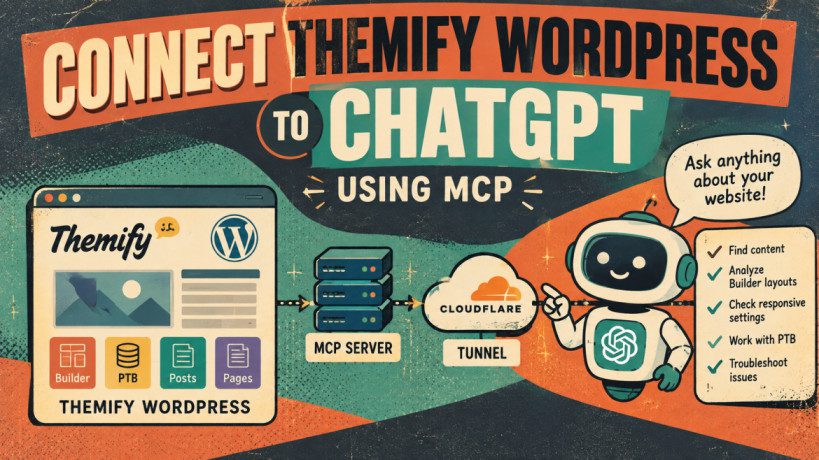
Connect Themify WordPress to ChatGPT Using MCP
Imagine being able to ask ChatGPT:
“What sections are on my Home page?”
“Find the section containing ‘About Us’.”
“What is the mobile padding for this section?”
“Find all my upcoming events.”
Instead of opening WordPress, searching through pages, and checking Themify Builder settings manually, ChatGPT could retrieve this information directly from your website.
This is where MCP (Model Context Protocol) can help.
In this guide, we’ll explain MCP in simple terms, show how the connection works, and walk through the setup step by step.
What is MCP?
MCP stands for Model Context Protocol.
In simple terms, MCP allows an AI assistant to communicate with external tools and data.
Think of it as a bridge between ChatGPT and your WordPress website.
The basic connection looks like this:
ChatGPT
   ↓
MCP
   ↓
MCP Server
   ↓
WordPress
   ↓
Themify Builder
ChatGPT doesn’t directly access your WordPress database. Instead, the MCP server provides specific tools that ChatGPT is allowed to use.
Why Connect Themify to ChatGPT?
Themify Builder stores a lot of useful information inside your pages.
For example:
- Rows and columns
- Text modules
- Images
- Buttons
- Accordions
- Sliders
- Backgrounds
- Colors
- Typography
- Padding and margins
- Responsive settings
- Custom post types
- PTB fields
Normally, you need to open the WordPress dashboard and inspect these settings yourself.
With an MCP connection, ChatGPT can potentially retrieve this information and help you understand it.
What Can You Do With It?
The most important part of this project is understanding what the integration can actually do.
1. Ask About Your Website
You could ask:
“What WordPress theme is this website using?”
The MCP server can retrieve the site’s information and return it to ChatGPT.
You could also ask:
“What version of WordPress is installed?”
or:
“What theme is active?”
2. Search Your WordPress Posts
You could ask:
“Find posts about WordPress security.”
The MCP server searches the WordPress content that it has been configured to expose.
You could also ask:
“Find posts in the Featured category.”
This can be much easier than manually searching through WordPress.
3. Understand a Themify Page
This is where the integration becomes especially useful.
Imagine your Home page contains:
Hero
About Us
Statistics
Certificates
FAQ
Doctors
Partners
Newsletter
Instead of looking through the Builder manually, you could ask:
“Show me the structure of my Home page.”
The MCP server can retrieve the Builder data, and ChatGPT can turn that information into a more understandable structure.
4. Find Specific Content
Suppose your website has a large Builder page.
You remember that somewhere on the page there is:
“Your Healthcare Solutions Partner”
Instead of searching manually, you could ask:
“Where is ‘Your Healthcare Solutions Partner’ used?”
A Builder search tool could find the relevant module.
This can be particularly useful on large websites.
5. Check Responsive Settings
Themify Builder has different settings for desktop, tablet, and mobile.
For example:
Desktop
Padding: 40px

Tablet
Padding: 30px

Mobile
Padding: 20px
An MCP tool could expose these settings.
You could then ask:
“What padding is being used on mobile?”
or:
“What responsive settings are applied to this section?”
This could make troubleshooting responsive issues much easier.
6. Troubleshoot Themify Builder Issues
Imagine a client says:
“The section looks fine on desktop but is too narrow on mobile.”
Instead of immediately guessing, you could retrieve the Builder settings and inspect things such as:
- Column width
- Padding
- Margin
- Responsive visibility
- Typography
- Background settings
- Alignment
- Row settings
You could then ask ChatGPT:
“Check the Builder settings that could affect the width of this section.”
The important part is that the AI can work from the available Builder configuration rather than simply giving a generic CSS suggestion.
7. Work With Post Type Builder (PTB)
If your website uses Themify Post Type Builder, MCP can also be used to expose selected custom post data.
For example, you might have:
Excursions

Name
Location
Price
Date
Description
Images
You could ask:
“Find the excursion called Sunset Cruise.”
Or:
“Find all excursions in Goa.”
The exact functionality depends on which PTB data your MCP bridge exposes.
8. Help With WordPress Support
This could be particularly useful for people who manage multiple WordPress websites.
For example, a support request might say:
“The mobile spacing on the Home page is wrong.”
Instead of immediately asking for access or screenshots, an MCP-powered support assistant could potentially inspect the relevant Builder settings.
The workflow could look like:
Client reports issue
       ↓
ChatGPT
       ↓
MCP
       ↓
WordPress
       ↓
Themify Builder
       ↓
Relevant settings
       ↓
Troubleshooting explanation
This could save time when supporting websites.
How Does the Connection Work?
There are several pieces involved.
                ChatGPT
                   ↓
              MCP Connection
                   ↓
            Cloudflare Tunnel
                   ↓
             MCP Server
                   ↓
          WordPress REST API
                   ↓
          Themify / PTB / Builder
Each part has a different job.
ChatGPT
This is where you ask questions.
MCP Server
This provides the tools ChatGPT can use.
WordPress MCP Bridge
This provides controlled REST endpoints for WordPress data.
Themify Builder
This is where the actual Builder page information comes from.
Cloudflare Tunnel
During local development, this provides an HTTPS path to your local MCP server.
Step 1: Install the WordPress MCP Bridge
The first component is a small WordPress plugin.
Its job is to expose selected WordPress and Themify information through REST API endpoints.
For example:
/wp-json/themify-mcp/v1/sitecan provide site information.
Another endpoint can search posts:
/wp-json/themify-mcp/v1/postsAnd the Builder endpoint can retrieve Builder data:
/wp-json/themify-mcp/v1/builder/{page-id}Install the plugin through:
WordPress Dashboard → Plugins → Add New → Upload Plugin
Then activate it.
Step 2: Create WordPress Authentication
The MCP server needs permission to communicate with WordPress.
One option is a WordPress Application Password.
Go to:
Users → Profile → Application Passwords
Create a new application password for the MCP connection.
Keep this password private
Don’t put it in:
- Screenshots
- GitHub
- Blog posts
- Public documentation
- Chat messages
If you accidentally expose it, revoke it and create a new one.
Step 3: Create the MCP Server
The next component is a small Node.js application.
A typical structure looks like:
mcp-server/
├── server.js
├── package.json
├── .env
└── .env.example
Install the required packages:
npm installThe server uses the WordPress credentials and MCP API key stored in .env.
For example:
WP_URL=http://yoursite.com
WP_USERNAME=your-username
WP_APPLICATION_PASSWORD=your-password
MCP_API_KEY=your-api-key
PORT=3000
Never publish these values.
Step 4: Start the MCP Server
Run:
npm startYou should see:
Themify MCP server listening on port 3000Now test it:
curl http://localhost:3000/healthYou should receive:
{"ok":true,"service":"themify-mcp"}That means the MCP server is running.
Step 5: Test the WordPress Connection
Now test whether the MCP bridge can communicate with WordPress.
For example:
curl -u themify-mcp http://themify.local/wp-json/themify-mcp/v1/siteIf everything is working, WordPress should return information about the website.
Step 6: Test Themify Builder
Next, retrieve Builder data for a page.
For example, if the page ID is 2319:
curl -u themify-mcp "http://themify.local/wp-json/themify-mcp/v1/builder/2319"The response contains the Builder data for that page.
This can include information about:
- Text
- Images
- Modules
- Layouts
- Responsive settings
- Spacing
- Colors
- Other Builder configuration
This is the point where the MCP server starts becoming Themify-aware.
Step 7: Make the MCP Server Accessible
There is one problem with LocalWP.
Your website might only be available at:
http://themify.local/And your MCP server might only be available at:
http://localhost:3000These addresses are local to your computer.
For development, you can use Cloudflare Tunnel to create an HTTPS address that reaches your local MCP server.
Step 8: Install Cloudflare Tunnel
On macOS:
brew install cloudflaredCheck the installation:
cloudflared --versionStep 9: Start the Tunnel
Keep your MCP server running.
Open another Terminal tab and run:
cloudflared tunnel --url http://localhost:3000Cloudflare will give you a temporary address similar to:
https://example.trycloudflare.comYour connection now looks like:
Internet
   ↓
Cloudflare
   ↓
localhost:3000
   ↓
MCP Server
Step 10: Test the Public Connection
Test the Cloudflare address:
curl https://example.trycloudflare.com/healthYou should get:
{"ok":true,"service":"themify-mcp"}If you get that response, your local MCP server is reachable through the public HTTPS tunnel.
Your MCP endpoint will be:
https://example.trycloudflare.com/mcpStep 11: Connect It to ChatGPT
If your ChatGPT account or workspace provides the required custom MCP/developer functionality, the /mcp endpoint can be registered as a remote MCP app.
Use:
https://example.trycloudflare.com/mcpDo not use /health as the MCP endpoint.
The exact MCP app options available depend on your ChatGPT plan and workspace.
Important: Start With Read-Only Access
We strongly recommend starting with read-only tools.
For example:
get_site_info
search_posts
get_ptb_post
get_themify_builder_data
Once these work correctly, you can add more advanced tools.
What Could Be Added Later?
The MCP server can eventually become much more powerful.
For example:
Find a page
find_pageUnderstand Builder modules
get_builder_modulesSearch Builder text
search_builder_textCheck responsive settings
get_responsive_settingsUpdate content
update_builder_textUpdate selected settings
update_builder_spacingThe last two should only be added after proper permission and confirmation controls are in place.
What Would a Themify AI Assistant Look Like?
Eventually, the idea could look like this:
              THEMIFY AI ASSISTANT
                       │
          ┌────────────┼────────────┐
          ↓            ↓            ↓
       Builder        PTB       WordPress
          │            │            │
          ↓            ↓            ↓
       Layout        Fields       Posts
You could ask:
“Show me the Home page structure.”
“Find the FAQ section.”
“What mobile settings are applied to this row?”
“Find all posts using this category.”
“Check this page for responsive settings.”
And eventually, with carefully controlled write access:
“Change this heading.”
“Update this image.”
“Change the mobile padding to 20px.”
A Simple Way to Think About MCP
If MCP sounds complicated, think of it this way:
Without MCP
You
 ↓
WordPress Dashboard
 ↓
Find Page
 ↓
Open Builder
 ↓
Find Setting
With MCP
You
 ↓
ChatGPT
 ↓
“Check my Home page”
 ↓
MCP
 ↓
Themify Builder
The AI becomes an interface for retrieving information from the systems you connect to it.
Security: Don’t Skip This Part
Because MCP can connect an AI system to your website, security is extremely important.
Start with:
Read-only access.
Also:
- Keep API keys private.
- Keep WordPress Application Passwords private.
- Don’t expose administrator credentials.
- Expose only the data you need.
- Use HTTPS.
- Add permission checks.
- Add confirmation before important changes.
- Log important write operations.
- Use a proper secured tunnel for production.
Cloudflare Quick Tunnels are useful for development and testing, but they are not the recommended production setup. For production, use a named tunnel and appropriate access controls.
What We Have Built
The complete development setup looks like this:
┌─────────────────────┐
│      ChatGPT        │
└──────────┬──────────┘
           │
           │ MCP
           ↓
┌─────────────────────┐
│  Cloudflare Tunnel  │
└──────────┬──────────┘
           │
           │ HTTPS
           ↓
┌─────────────────────┐
│  Node.js MCP Server │
│      Port 3000      │
└──────────┬──────────┘
           │
           │ REST API
           ↓
┌─────────────────────┐
│      WordPress      │
│       LocalWP       │
└──────────┬──────────┘
           │
           ↓
┌─────────────────────┐
│  Themify Builder    │
│       + PTB         │
└─────────────────────┘
Final Thoughts
Connecting Themify WordPress to ChatGPT using MCP opens up an interesting way to work with WordPress.
The goal isn’t simply to let ChatGPT read WordPress.
The bigger goal is to make ChatGPT understand the structure and data of a Themify website.
That could eventually make tasks such as:
- Finding content
- Understanding Builder layouts
- Checking responsive settings
- Troubleshooting pages
- Working with PTB
- Managing repetitive WordPress tasks
much easier.
The best approach is to start small:
Read → Understand → Test → Secure → Then Write.
That gives you a solid foundation for building a Themify-aware AI assistant without giving an AI unnecessary access to your website.
Guide here themify-chatgpt-mcp-guide