

























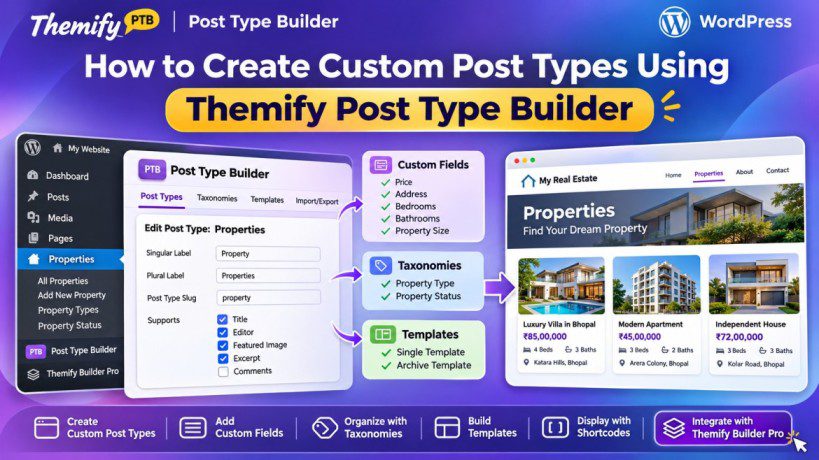
How to Create Custom Post Types Using Themify Post Type Builder
WordPress is an incredibly flexible platform. You can use it to create almost any type of website, from a simple personal blog to a business directory, property listing website, portfolio, restaurant website, or online booking platform.
By default, WordPress provides two main content types: Posts and Pages. Posts are generally used for blog articles, while Pages are used for static content such as About Us, Contact, and Services.
But what if you want to create something more specific?
For example:
- A real estate website where you can add properties with prices, addresses, bedrooms, and property images.
- A movie review website where every movie has a director, release date, genre, rating, and trailer.
- A portfolio website where every project has a client name, project category, completion date, and gallery.
- A tourism website where you can publish excursions with destinations, prices, durations, and images.
Creating all these things using regular WordPress posts can become difficult to manage.
This is where Custom Post Types come into the picture.
With the Themify Post Type Builder plugin, you can create your own content types, add custom fields, organize content using taxonomies, and build custom layouts without writing PHP code.
In this guide, we will explain everything step by step so that even beginners can understand how to create and manage custom post types using Themify Post Type Builder.
1. What Is a Custom Post Type in WordPress?
Before jumping into the plugin, let’s understand what a custom post type actually means.
Think of WordPress as a filing cabinet.
Inside this cabinet, you have different drawers:
- Posts: For blog articles.
- Pages: For website pages.
- Products: For WooCommerce products.
- Media: For images, videos, and documents.
Now imagine that you are building a real estate website. You don’t want to store every property as a regular blog post. You want a separate section called Properties where you can manage all your property listings.
A Custom Post Type allows you to create exactly that.
You can create additional content types that appear separately in your WordPress dashboard.
For example:
| Website Type | Custom Post Type |
|---|---|
| Real Estate Website | Properties |
| Movie Website | Movies |
| Portfolio Website | Projects |
| Restaurant Website | Restaurants |
| Tourism Website | Excursions |
| Musician Website | Songs |
| Job Portal | Jobs |
| Education Website | Courses |
Each custom post type can have its own fields, categories, and templates.
In simple words: A custom post type lets you create a new content section in WordPress that works independently of regular blog posts and pages.
2. What Is Themify Post Type Builder?
Themify Post Type Builder, commonly known as PTB, is a WordPress plugin that allows you to create custom post types without manually writing PHP code.
Instead of hiring a developer to register post types and create custom fields, you can configure everything directly from your WordPress dashboard.
With PTB, you can:
- Create unlimited custom post types.
- Add custom fields to your content.
- Create custom taxonomies.
- Build single post templates.
- Build archive templates.
- Display custom posts using shortcodes.
- Import and export post type configurations.
- Add specialized fields using PTB addons.
- Integrate custom fields with Themify Builder Pro.
For example, if you are creating a property listing website, you can create a Properties post type and add fields such as:
- Property Price
- Property Address
- Number of Bedrooms
- Number of Bathrooms
- Property Size
- Property Gallery
- Property Description
Whenever you add a new property, WordPress will display these fields in the editing screen.
You simply enter the information, upload the images, and publish the property.
You don’t need to create a new page layout manually for every property.
Official plugin: https://themify.me/post-type-builder
3. What Do You Need Before Getting Started?
Before creating your first custom post type, make sure you have the following:
- A working WordPress website.
- The Themify Post Type Builder plugin.
- Administrator access to your WordPress dashboard.
- A clear idea of the type of content you want to manage.
You don’t necessarily need a Themify theme to use PTB. The plugin works with standard WordPress themes.
However, if you want to design advanced dynamic layouts visually, using Themify Builder Pro alongside PTB is recommended.
Installing Themify Post Type Builder
Follow these steps:
- Log in to your Themify Member Area.
- Download the Post Type Builder plugin ZIP file.
- Open your WordPress dashboard.
- Navigate to Plugins > Add New Plugin.
- Click Upload Plugin.
- Select the downloaded ZIP file.
- Click Install Now.
- Once installation is complete, click Activate Plugin.
After activation, you should see the Post Type Builder menu in your WordPress dashboard.
You are now ready to create your first custom post type.
4. Plan Your Custom Post Type Before Creating It
This is an important step that beginners often skip.
Before opening the PTB settings, decide what type of content you want to create and what information each entry should contain.
For this tutorial, let’s create a Property Listing Website.
Imagine that you want to publish different properties for sale and rent.
Each property should contain:
- Property Name
- Property Description
- Property Price
- Property Address
- Number of Bedrooms
- Number of Bathrooms
- Property Size
- Property Images
- Property Type
- Property Status
We can divide this information into three groups:
Basic WordPress Fields: Title, content, featured image, and excerpt.
Custom Fields: Price, address, bedrooms, bathrooms, and property size.
Taxonomies: Property Type and Property Status.
Understanding these three groups will make the entire process much easier.
5. Create Your First Custom Post Type
Now let’s create the Properties post type.
Follow these steps:
- Go to WordPress Dashboard.
- Navigate to Post Type Builder > Post Types.
- Click Add New.
You will see several settings that allow you to configure your new post type.
Let’s understand them individually.
Singular Label
Enter the name used for one individual entry.
For our example, enter:
Property
Plural Label
Enter the name used for multiple entries.
Enter:
Properties
WordPress will use these labels in the dashboard.
For example, you will see Properties in the admin menu and Add New Property when creating an entry.
Post Type Slug
The slug is an important setting because it determines the URL structure of your custom post type.
For our example, enter:
property
Keep the slug lowercase, use English characters, avoid spaces, and make sure it is unique.
Your property URLs may look something like:
yourwebsite.com/property/luxury-villa/
Choose your slug carefully because changing it later can affect existing URLs and search engine rankings.
Description
Add a short description explaining what this post type is used for.
For example:
Manage all property listings, including residential homes, apartments, commercial properties, and land.
Supports
The Supports section allows you to select which standard WordPress features should be available for your custom post type.
Depending on your requirements, you can enable:
- Title
- Editor
- Featured Image
- Excerpt
- Comments
- Author
- Revisions
For our property website, we recommend enabling Title, Editor, Featured Image, and Excerpt.
If you want visitors to comment on individual property listings, you can enable Comments as well.
Custom Labels and Advanced Options
PTB also provides Custom Labels and Advanced Options.
Custom Labels allow you to change the default text displayed in the WordPress administration area.
Advanced Options provide additional registration settings for your post type.
For beginners, the default settings are generally a good starting point. Review options such as public visibility and archive support according to how you want your content to appear.
Once everything is configured, save your post type.
Congratulations! You have created your first custom post type.
You should now see Properties as a separate menu in your WordPress dashboard.
6. Add Custom Fields Using Meta Box Builder
Creating a custom post type is only the beginning.
The real power of PTB comes from its Meta Box Builder.
What is a custom field?
A custom field is an additional information field that you can attach to a post.
For example, a regular WordPress post has a title and content editor. But a property listing needs more information, such as price, address, and property size.
Instead of putting everything inside the description, you can create separate fields for each piece of information.
This makes your content easier to manage and display.
How to Add Custom Fields
- Go to Post Type Builder > Post Types.
- Edit your Properties post type.
- Locate the Meta Box Builder section.
- Click Add Field.
- Select the field type you need.
- Enter the field label and configure its settings.
- Repeat the process for other fields.
- Save your changes.
Let’s look at some useful fields for our property website.
Text Field
Use a Text field when you want users to enter a short piece of information.
Examples:
- Property Address
- Agent Name
- Property Reference Number
Number Field
Use a Number field for numerical values.
Examples:
- Property Price
- Number of Bedrooms
- Number of Bathrooms
- Property Size
Textarea Field
A Textarea field is useful when you want users to enter longer information.
Examples:
- Property Description
- Additional Information
- Property Features
Select Field
A Select field allows users to choose one option from a predefined list.
For example, you can create a field called Furnishing Status with options:
- Furnished
- Semi-Furnished
- Unfurnished
This makes information consistent across all property listings.
Radio Button Field
A Radio Button field allows users to select only one option from a group.
For example:
Property Availability:
- Available
- Sold
- Under Offer
Checkbox Field
Checkboxes allow users to select multiple options.
For example, Property Amenities:
- Swimming Pool
- Parking
- Garden
- Gym
- Security
- Elevator
Image Field
Use an Image field when you want to upload additional images related to a specific entry.
For example, you can add floor plans, interior images, or additional property photographs.
PTB also provides other field types, including date, video, audio, map, rating, slider, link button, and accordion fields, depending on the available core and addon functionality.
Choose fields based on the information you actually need. Adding unnecessary fields can make the editing experience confusing.
7. What Are Taxonomies in WordPress?
Taxonomies are another important part of custom post types.
Let’s understand them with a simple example.
Imagine you have 100 properties on your website.
Some properties are apartments, some are villas, and others are commercial buildings.
How will visitors find the type of property they are interested in?
This is where taxonomies help.
A taxonomy is a way to group and organize similar content.
WordPress already provides Categories and Tags for regular blog posts.
With PTB, you can create custom taxonomies for your own post types.
For our property website, we can create:
Property Type:
- Apartment
- Villa
- Commercial
- Residential
- Land
Property Status:
- For Sale
- For Rent
- Sold
Location:
- Indore
- Mumbai
- Delhi
This allows you to organize properties into meaningful groups.
How to Create a Custom Taxonomy
- Go to Post Type Builder > Taxonomies.
- Click Add New.
- Enter the Singular Label.
- Enter the Plural Label.
- Enter the Taxonomy Slug.
- Select the post type to which the taxonomy should be attached.
- Configure the Custom Labels and Advanced Options if required.
- Save your taxonomy.
For example:
Singular Label: Property Type
Plural Label: Property Types
Slug: property-type
Attach To: Properties
After saving, you can add terms such as Apartment, Villa, and Commercial.
These taxonomy terms will appear in the editing screen when you add or edit a property.
Important: If you are creating taxonomies before creating your post type, you can attach them during post type configuration. Otherwise, you can edit your post type later and assign the required taxonomies.
8. Create Your First Property Listing
Now that we have created the post type, custom fields, and taxonomies, let’s add an actual property.
Navigate to:
Properties > Add New
You should see the familiar WordPress editing screen along with the custom fields you created.
Let’s add a sample property.
Property Title: Luxury Villa in Bhopal
Description: A beautiful luxury villa with spacious bedrooms, a modern kitchen, a private garden, and dedicated parking.
Property Price: ₹85,00,000
Property Address: Katara Hills, Bhopal
Bedrooms: 4
Bathrooms: 3
Property Size: 2,500 sq. ft.
Property Type: Villa
Property Status: For Sale
Upload a featured image and complete the remaining fields.
Once everything is ready, click Publish.
Your first property listing is now available in WordPress.
Repeat this process whenever you want to add another property.
The best part is that you don’t need to create a new design for every property. You can use a template to display all your properties consistently.
9. Create Single and Archive Templates
Creating content is one thing. Displaying it beautifully on your website is another.
This is where PTB Templates come into play.
A template controls how your custom post type appears on the frontend.
PTB provides two important template types:
Single Post Template
A Single Post Template controls how an individual entry looks when someone opens it.
For example:
When a visitor opens Luxury Villa in Bhopal, they should see:
- Property Title
- Featured Image
- Property Price
- Property Address
- Number of Bedrooms
- Number of Bathrooms
- Property Description
- Additional Images
Instead of manually designing this layout for every property, you create one template.
PTB automatically uses that template for the individual property entries assigned to it.
Archive Template
An Archive Template controls how multiple entries are displayed together.
For example:
When someone visits:
yourwebsite.com/property/
They should see a listing of all published properties.
An archive layout may contain:
- Property Image
- Property Title
- Price
- Location
- Property Type
- Read More Link
You can also configure the number of posts per page, post layout, sorting order, and pagination.
How to Edit PTB Templates
After creating a custom post type, PTB can guide you to its template configuration.
Alternatively:
- Navigate to Post Type Builder > Templates.
- Select the relevant template.
- Open the Archive Template or Single Post Template editor.
- Drag the available modules into the template layout.
- Configure the module settings.
- Arrange the modules according to your design.
- Save your template.
The available modules are based on the standard WordPress features, custom fields, and taxonomies associated with your post type.
You can use multiple rows and columns to create the layout you want.
For example, you can display the property image on the left and the price, address, and property details on the right.
Important: PTB templates are assigned to a specific post type. The template assignment has restrictions, so plan your template structure before creating multiple templates.
10. Display Custom Post Types Using Shortcodes
What if you want to display your custom posts on a regular WordPress page?
For example, you want to create a page called Available Properties and display all property listings there.
You can use the PTB shortcode functionality.
Navigate to Pages > Add New and create a page.
You can use the PTB shortcode generator to configure and insert the post listing shortcode.
The shortcode allows you to display custom post entries using the archive layout you have created.
For example, you could create a dedicated page for:
- Featured Properties
- Latest Projects
- Movie Reviews
- Restaurant Listings
- Available Excursions
PTB also provides a taxonomy shortcode for displaying taxonomy links.
For example:
[ptb_taxonomy type="property" tax="property-type"]
This can help display property type links on your website.
You can also use the PTB Field shortcode to display individual custom field values within a supported post loop.
For example:
[ptb_field name="property_price"]
Make sure the field name matches the actual field name configured in PTB.
11. Use Themify Builder Pro for Advanced Dynamic Templates
If you want more design flexibility, you can combine PTB with Themify Builder Pro.
Think of PTB as the tool that creates and manages your content structure, while Builder Pro gives you more visual control over how that content is displayed.
For example:
PTB creates the Properties post type and fields such as:
- Price
- Address
- Bedrooms
- Bathrooms
- Property Gallery
Builder Pro allows you to visually design the property page and dynamically display these fields using its dynamic content functionality.
You can create attractive layouts using Builder modules such as:
- Text
- Image
- Button
- Map
- Accordion
- Gallery
The biggest advantage is that you can design a template once and reuse it across multiple properties.
For example, you can create a single property template with the following layout:
Top Section: Property title and featured image.
Details Section: Property price, address, bedrooms, and bathrooms.
Description Section: Full property description.
Gallery Section: Additional property photographs.
Contact Section: Contact button or inquiry form.
When someone opens another property, the template automatically displays that property’s information.
You don’t have to manually change the title, price, address, or images in the template.
Builder Pro also supports template display conditions, allowing you to assign templates to specific post types and other content.
This combination is particularly useful when building directory websites, real estate websites, portfolios, and other dynamic websites.
12. Import and Export Custom Post Types
One of the useful features of PTB is its Import/Export functionality.
Imagine you have created a complete property listing system on one website.
Now you want to use the same setup on another WordPress website.
You don’t need to recreate everything from scratch.
PTB allows you to export your post types, associated taxonomies, custom fields, and templates.
How to Export
- Navigate to Post Type Builder > Import/Export.
- Locate the Export section.
- Select the post types you want to export.
- Choose whether to export the associated taxonomies and templates together or separately.
- Click Export.
- Download the generated JSON file.
How to Import
- Install and activate PTB on your destination website.
- Navigate to Post Type Builder > Import/Export.
- Locate the Import section.
- Upload the previously exported JSON file.
- Click Import.
Your configuration can now be transferred to the new website.
Remember that exporting a post type configuration is not the same as migrating all its actual posts, images, and other website content. You may need a separate WordPress content migration process for those.
13. Additional Features and PTB Addons
The core PTB plugin already provides the essential functionality required to create custom post types.
However, you can extend its capabilities using optional PTB addons.
Some useful extensions include:
PTB Search: Allows visitors to search and filter custom posts using specific fields and taxonomies.
For example, visitors can search properties based on price, location, and property type.
PTB Relation: Allows you to connect different post types.
For example, you can connect properties with agents or connect movies with actors.
PTB Submissions: Allows visitors to submit content through frontend forms without giving them WordPress dashboard access.
For example, property owners can submit their property details through a form.
PTB Map View: Allows you to display custom posts on a map using their map field information.
These addons are particularly useful when you want to build more advanced directory and listing websites.
Availability and installation requirements depend on the PTB membership and addon package.
14. Common Mistakes to Avoid When Creating Custom Post Types
Although PTB makes the process easier, there are some common mistakes you should avoid.
1. Choosing the Wrong Post Type Slug
Your post type slug affects the URL structure.
Avoid using spaces, uppercase letters, or reserved WordPress slugs.
Choose a meaningful slug before publishing content.
2. Creating Too Many Custom Fields
Don’t create fields just because they are available.
Think about the information you actually need.
For example, a movie website may need a director, release date, genre, and rating. It probably doesn’t need property-specific fields such as bedrooms or bathrooms.
3. Confusing Custom Fields with Taxonomies
This is one of the most common beginner mistakes.
Remember:
Custom fields store individual information about a post.
Taxonomies organize posts into groups.
For example:
Property Price is a custom field.
Property Type is a taxonomy.
4. Forgetting to Create Templates
You may successfully create a custom post type and add several entries, but nothing may appear as expected on your website if the appropriate frontend templates or display configuration are missing.
Always configure your Single and Archive templates.
5. Changing Slugs After Publishing Content
Changing a post type slug or taxonomy slug can affect existing URLs.
If you need to change one, plan appropriate redirects and test the website carefully.
6. Not Taking a Backup
Before making major changes to your website, create a backup.
This is especially important when you are modifying existing post types, taxonomies, or templates.
Creating custom post types is one of the best ways to organize content and build more flexible WordPress websites.
Instead of forcing everything into regular posts and pages, you can create dedicated content sections for properties, movies, projects, restaurants, excursions, courses, and much more.
With Themify Post Type Builder, you can create these content structures without writing complicated PHP code.
You can define custom fields, organize entries using taxonomies, build single and archive templates, and display your content using shortcodes.
And when you combine PTB with Themify Builder Pro, you get even more flexibility to design dynamic layouts and build professional websites.
Whether you are a beginner, freelancer, website designer, or developer, learning how to use custom post types can open up many new possibilities for your WordPress projects.
Start with a simple custom post type, experiment with custom fields and taxonomies, and gradually build more advanced dynamic websites using Themify Post Type Builder.